
Timesheets are personal and each person can configure them to their preferences.
Learn about:
- Timesheet options - week view or day view
- Adding time to your timesheet
- Entering a comment
- Customise your timesheet
- Submitting your timesheet (if required)
- Setting your notification preferences
Timesheet options
Timesheets operate in either a week view or day view mode to cater to different ways people work. There is also a targeted view for mobile phones so it is easy to do your timesheet from anywhere.
|
Week view |
Day view |
|---|---|
|
|
You can switch between modes at any time to find the one that works best for you.
Week view
The week view is best for people who typically work on a small number of items across the week, and/or don't need to update their timesheet throughout the day.
The week view of your timesheet lets you enter time across multiple days at once. Timecodes you add to your timesheet will be available to use all week, and if you pin them they'll be there ready for you the following week as well.
Even if you use the week view to do your timesheet, it is best practice is to complete your timesheet daily.
Day view
The day view is best for people who want to update their timesheet as they work or people who work on many activities each day.
The day view of your timesheet lets you keep track of your time throughout the day - tracking your time as you go. Entering time as you complete an activity means your timesheet is recorded accurately and is up to date.
Timesheet on your phone
You can use Projectworks in the browser of your phone. A good tip is to save a bookmark to Projectworks to your home screen so you can access your timesheet easily. Timesheets are always presented in day view mode on mobile devices.
Adding a time entry
It is easy to log time in Projectworks. Simply click the add time entry button to see the projects that are available for you to log time to. You can scroll through the list of projects, or search using the project name, project number or company name.
After selecting a project you will be able to choose from the timecodes that are available, just click the one (or ones) you want to add to your timesheet. Note that you will only be able to see the projects and timecodes that are active and available for you.
Tips:
-
Use multiple words when searching to refine the results
-
Projects you have recently logged time to will be listed at the top as suggested projects, followed by all projects available for you
- Pin a timecode to keep it on your timesheet if you will be using it often
-
Start your search with / (forward slash) to also search timecode names
With the timecode added to your timesheet you can enter time against it. Projectworks allows for time to be entered down to the minute, although your company may have rules on the granularity that time is entered.
There are three different ways that time can be recorded, all with the same result.
-
Minutes: Simply enter a number and it will be considered (eg 90 or 120)
-
Hours: To record time as hours you need to include decimals (eg 1.5 or 2.0)
-
Time: Enter formatted as time in hours and minutes (eg 1:30 or 2:00)
In the above example, all entries will be saved and presented in the time format
If you will be using a timecode often you can click the pin icon to the left of the timecode to keep it on your timesheet so you don’t have to add it each time.
Using timecodes that are on your timesheet already
Once a timecode is on your timesheet you can just log more time to it. However there are a few rules that may prevent you from editing an existing entry, or adding time on another day for a specific timecode. These include:
-
the timecode, budget line or project is no longer active
-
the time entry has been marked as reviewed (indicated by a green tick)
-
the time entry has been included on an invoice already
-
the month has been locked meaning no time entries can be added or edited for that month
-
the timesheet has been submitted or approved (if your company has adopted that process)
In all cases we suggest you contact your project manager or manager if you need to change a time entry.
Entering comments
Comments can be entered to support the time you are logging - some timecodes may even be set up with comments as mandatory. In the day view, the comment box is always displayed, while in the week view you need to trigger its display by clicking the speech bubble icon.
After entering your comment either press the enter key or click outside of the box to save the comment
Tip: You can press space or c when in a timeslot to display the comment box in week view.
Tip: The week view includes the ability to copy, cut and paste time entries. The time and comment are copied (or cut) and will both be pasted into the chosen time slot.
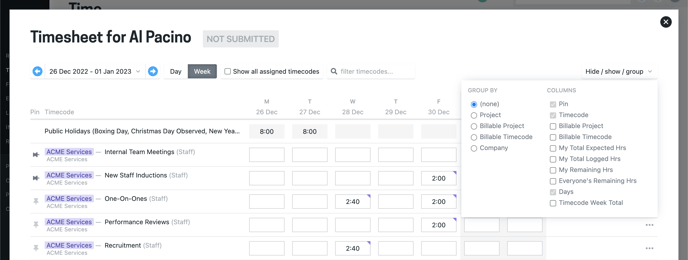
Customising your timesheet
The first time you access your timesheet it will show timecodes in alphabetical order (week view) or in the order of entry (day view). You are able to customise the view using the Hide / show / group option at the top right. This will allow you to change the way the timecodes are grouped and show additional columns.
Choose the columns you want to see
The Pin, Timecode, and Day columns always need to be shown, but you are able to choose other columns to see. Simply tick the ones you want to have on your timesheet:
-
Billable Project: Shows whether the timecode is on a billable or non-billable project.
-
Billable Timecode: Shows whether the timecode is billable or non-billable.
-
My Total Expected Hrs: If you’ve been allocated an expected number of hours for a timecode, this will show you the total hours you have been allocated.
-
My Total Logged Hrs: Shows the total you have logged for this timecode since you started.
-
My Remaining Hrs: If you’ve been allocated an expected number of hours for a timecode, this will show the number of hours you have remaining. It is calculated as: Expected hours allocated less all time you have logged to date
-
Everyone’s Remaining Hrs: If your project team has been allocated an expected number of hours for a timecode, this will show the combined number of hours that is remaining. It is calculated as: All expected hours allocated, less time everyone has logged to date.
-
Timecode Week Total: Shows the total you have logged to that timesheet for the week
Resize the columns and change the sorting
You can adjust the width of the columns and also specify the way the columns are sorted. Simply drag the column headers to adjust the width, or click the sort arrows that are shown when you hover over a column heading.
.gif?width=688&height=378&name=2023-02-16_16-16-47%20(1).gif)
Submitting your timesheet
Projectworks has a timesheet submit and approve process that can be implemented. If your company has adopted this process your timesheet will need to be submitted.
There are three different options for how timesheets are used, so this part will depend on what process your company has adopted.
Refer to the timesheet submit and approval article for more details
No submit required
If your company hasn’t implemented the submit or approval process there will be no option to submit your timesheet. Each time entry is saved as you go - there is nothing special you need to do.
The My Timesheets screen will still list all your weekly timesheets.
Timesheet needs to be submitted
If your company has implemented the submit process you will need to submit your timesheet at the specified time. It is easy to do - just click Submit when you are finished.
Submitted timesheets are locked for editing are able to be withdrawn if changes are needed. Open your timesheet and click the Set to Not Submitted button so you can make changes.
Note: While your timesheet will be editable again, there are rules around what can be add/edited. Contact your project manager If you are unable to make the change you need.
Timesheet needs to be submitted and approved
If your company has implemented the approval process, it is expected that a timesheet will need to be formally reviewed and approved by the appropriate person. From the timesheet the approver will be able to either approve or reject the timesheet.
Once approved the timesheet can no longer be edited and the timesheet submitter will not be able to withdraw it (set to not submitted). A rejected timesheet is able to be edited and resubmitted.
Notification preferences (set by each person)
Each person is able to set up their own notification preferences. The notifications settings are accessed from the bell icon at the top right of the screen.

Choose to receive an in-app notification or email when timesheets are submitted, approved or rejected.

Notifications will be off by default. Each person will need to opt in to receive them.