This article gives you a guide to setting up and editing Xero organisation mappings, so you can successfully export and manage invoices, expenses, leave and payroll in your accounting system.
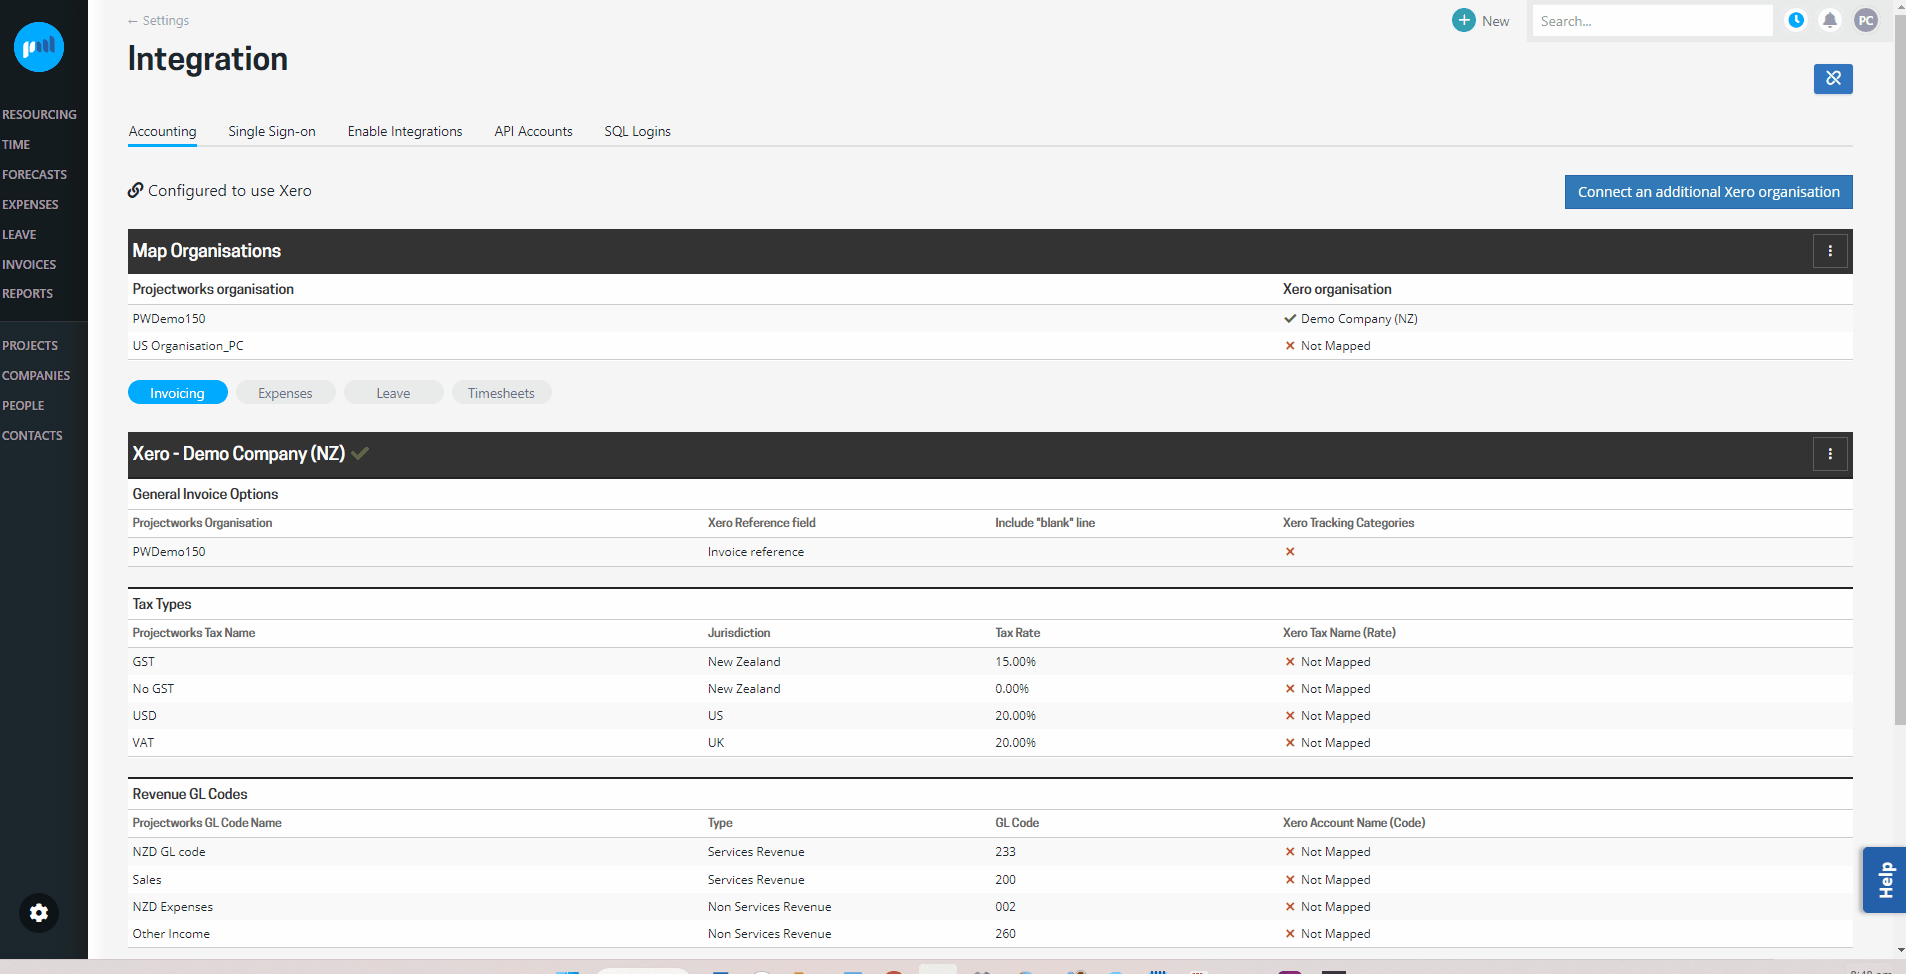
Map organisations
When Projectworks is first connected to Xero, the existing Projectworks organisations will be automatically mapped to that Xero organisation.
-png.png)
A Projectworks administrator can edit these mappings as required, e.g. if different Projectworks organisations are managed in different Xero organisations or a new organisation is added to Projectworks after Xero is connected.
Read more about integrating to an accounting system →
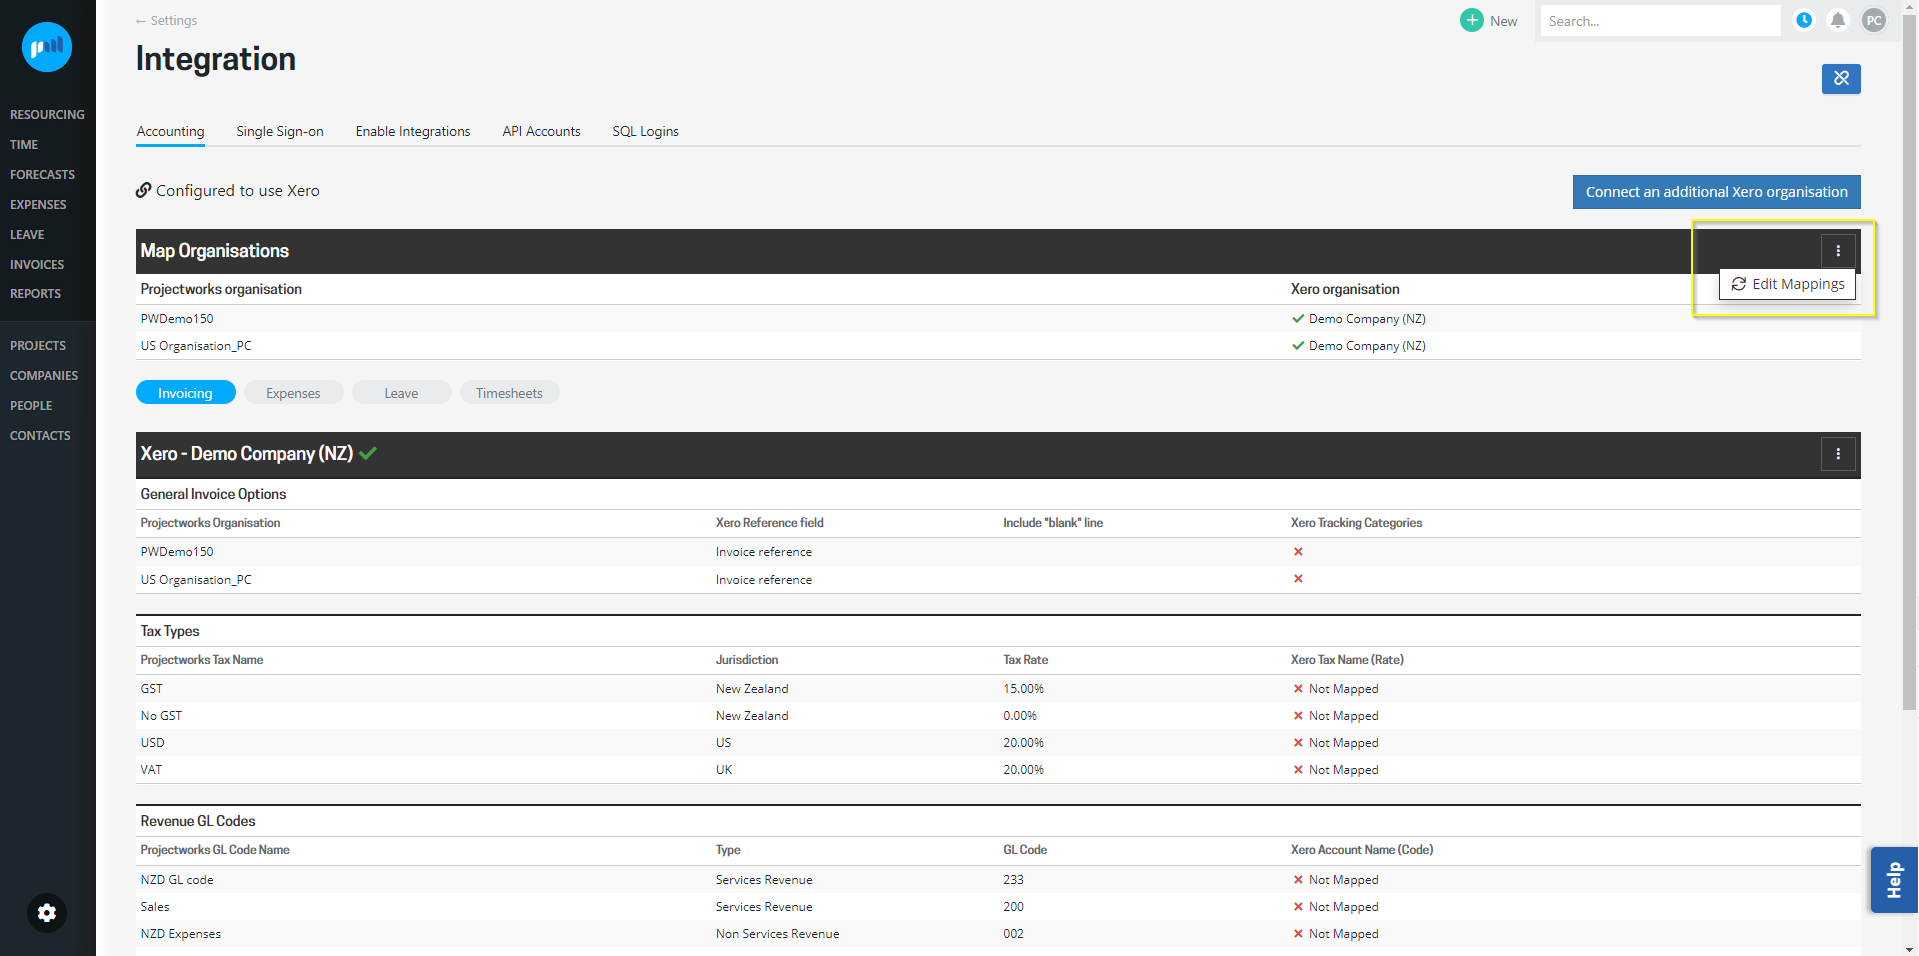
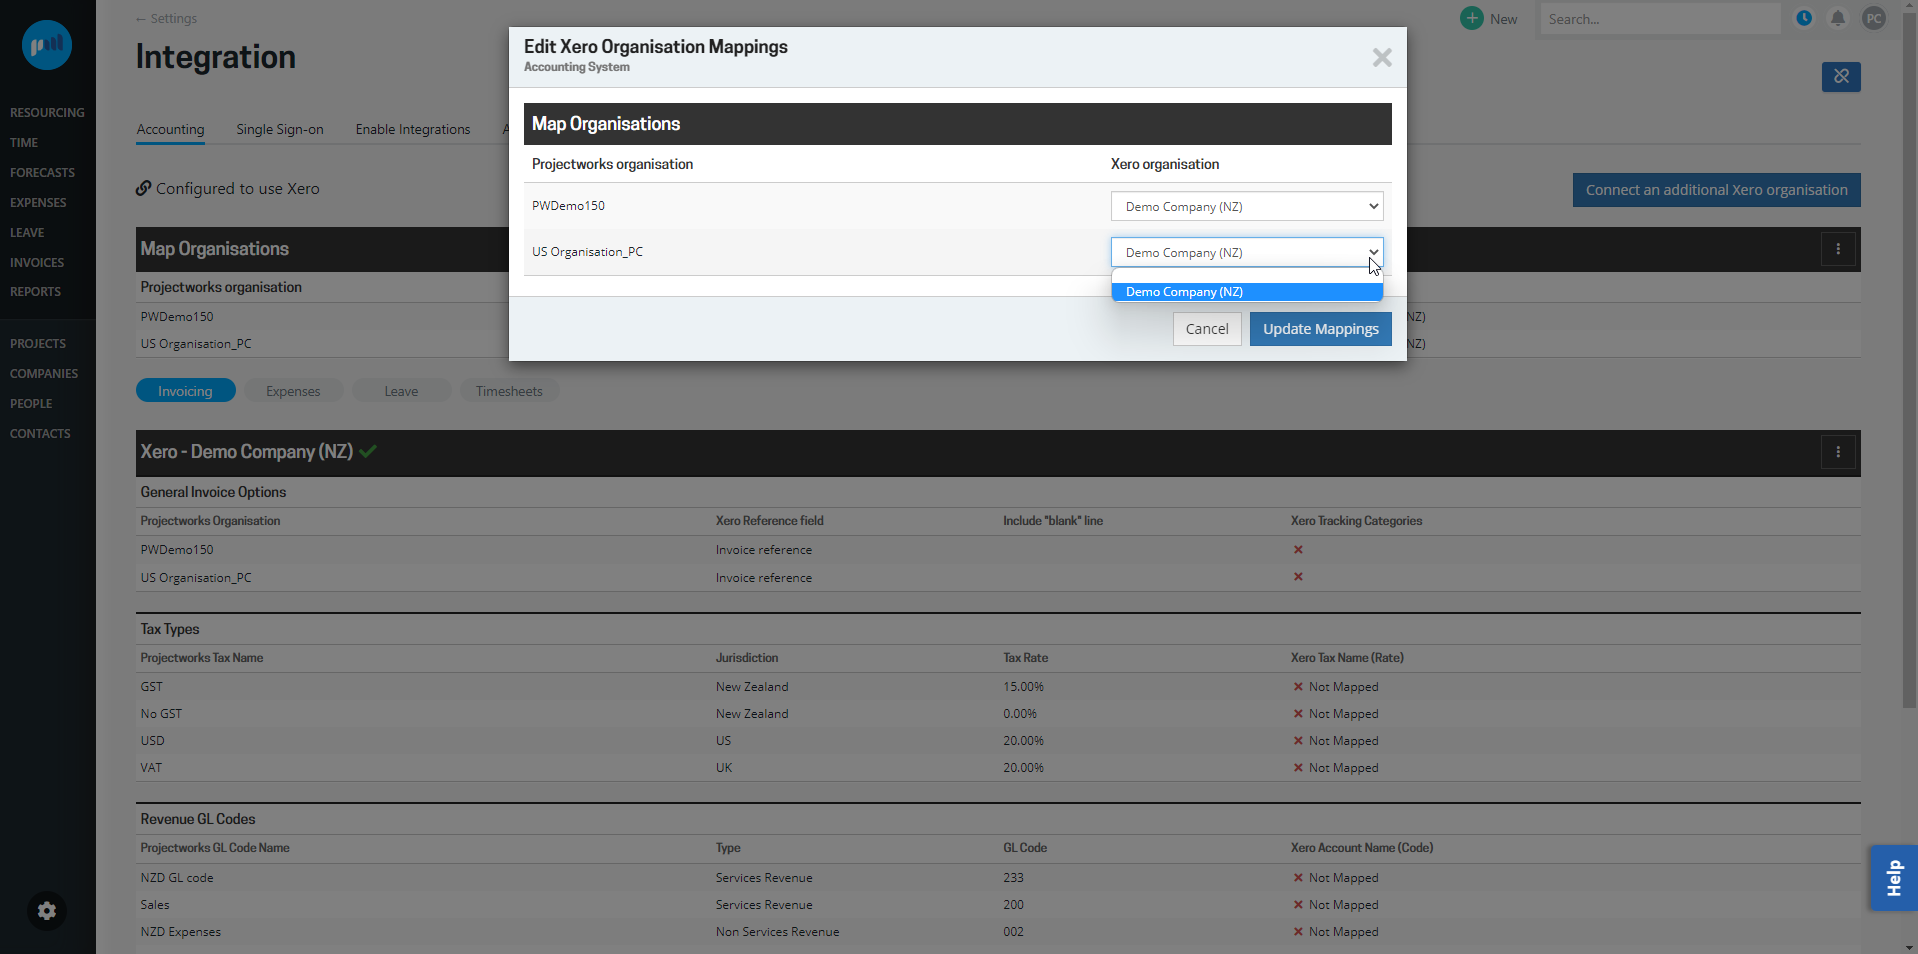
Edit Xero organisation mappings
To add or remove an organisation’s mapping:
-
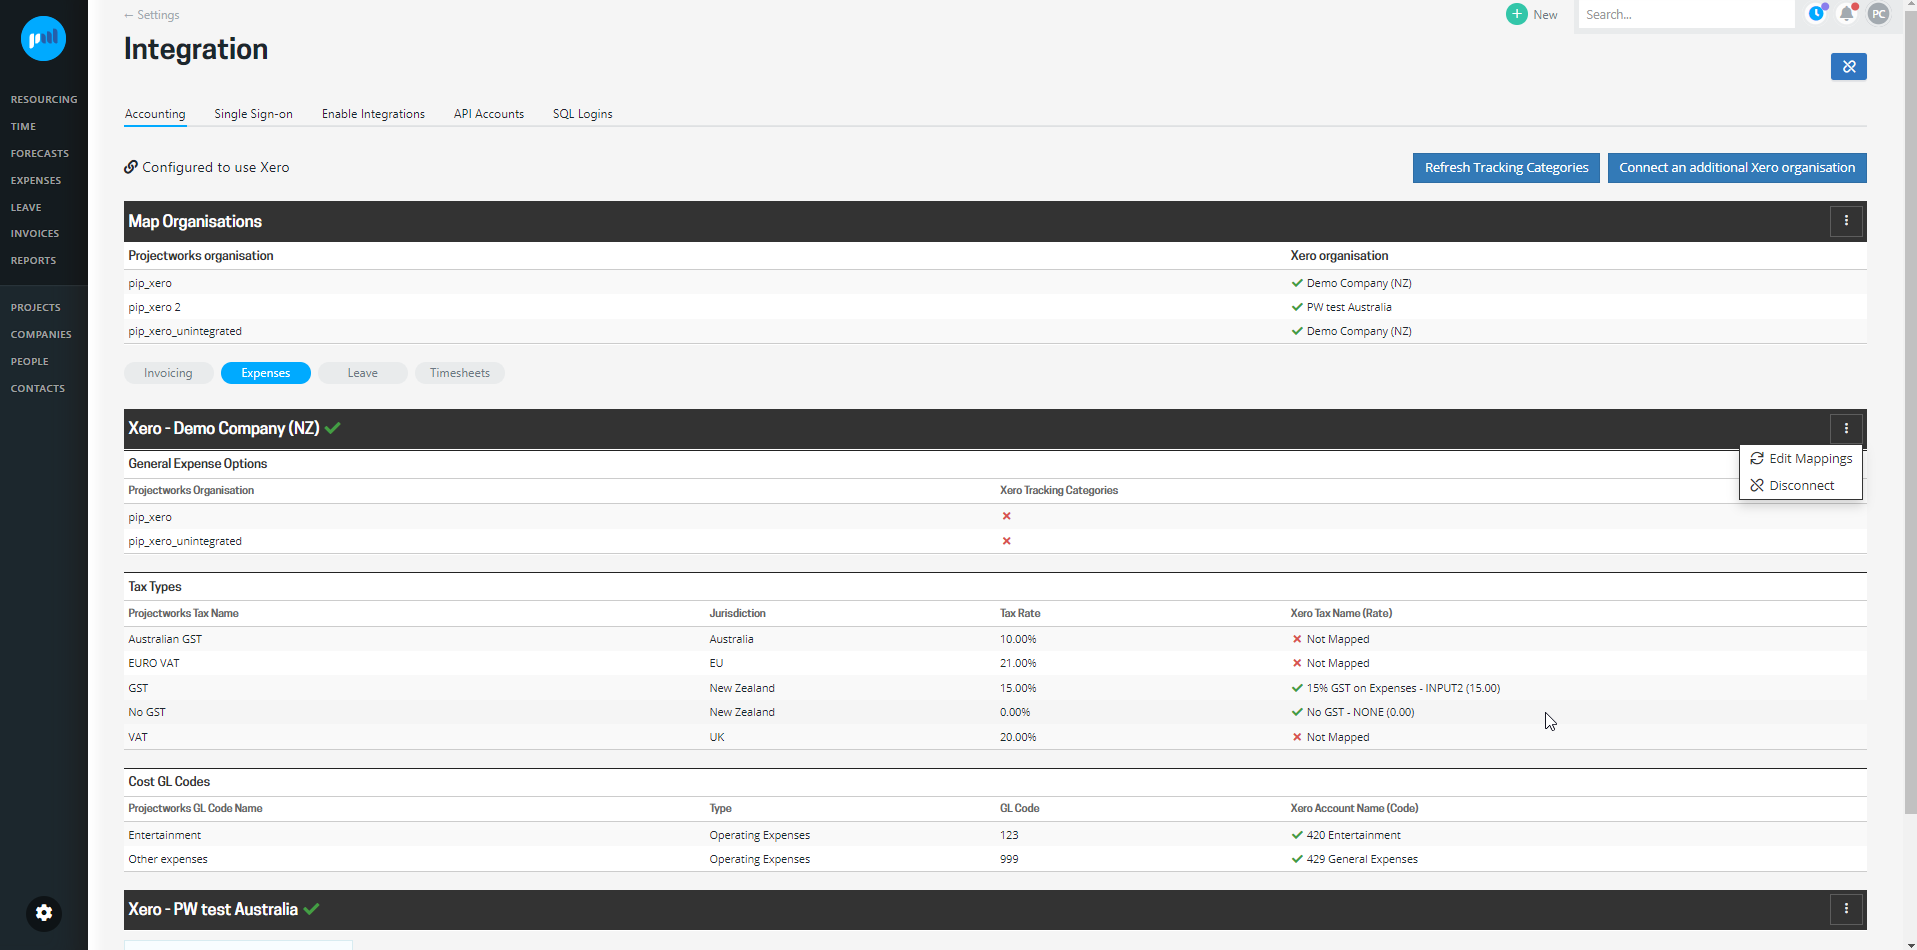
Go to: Settings > Integration > Accounting
-
Select the Map Organisations three vertical dots and select ‘Edit Mappings’
Map Invoicing
Invoicing will automatically be enabled when you map a Projectworks organisation to a Xero organisation. However to allow Projectworks invoices to be exported, invoicing must be mapped to each connected Xero organisation, including:
-
General Invoice Options;
-
Tax Types;
-
Revenue GL Codes;
-
Currencies.
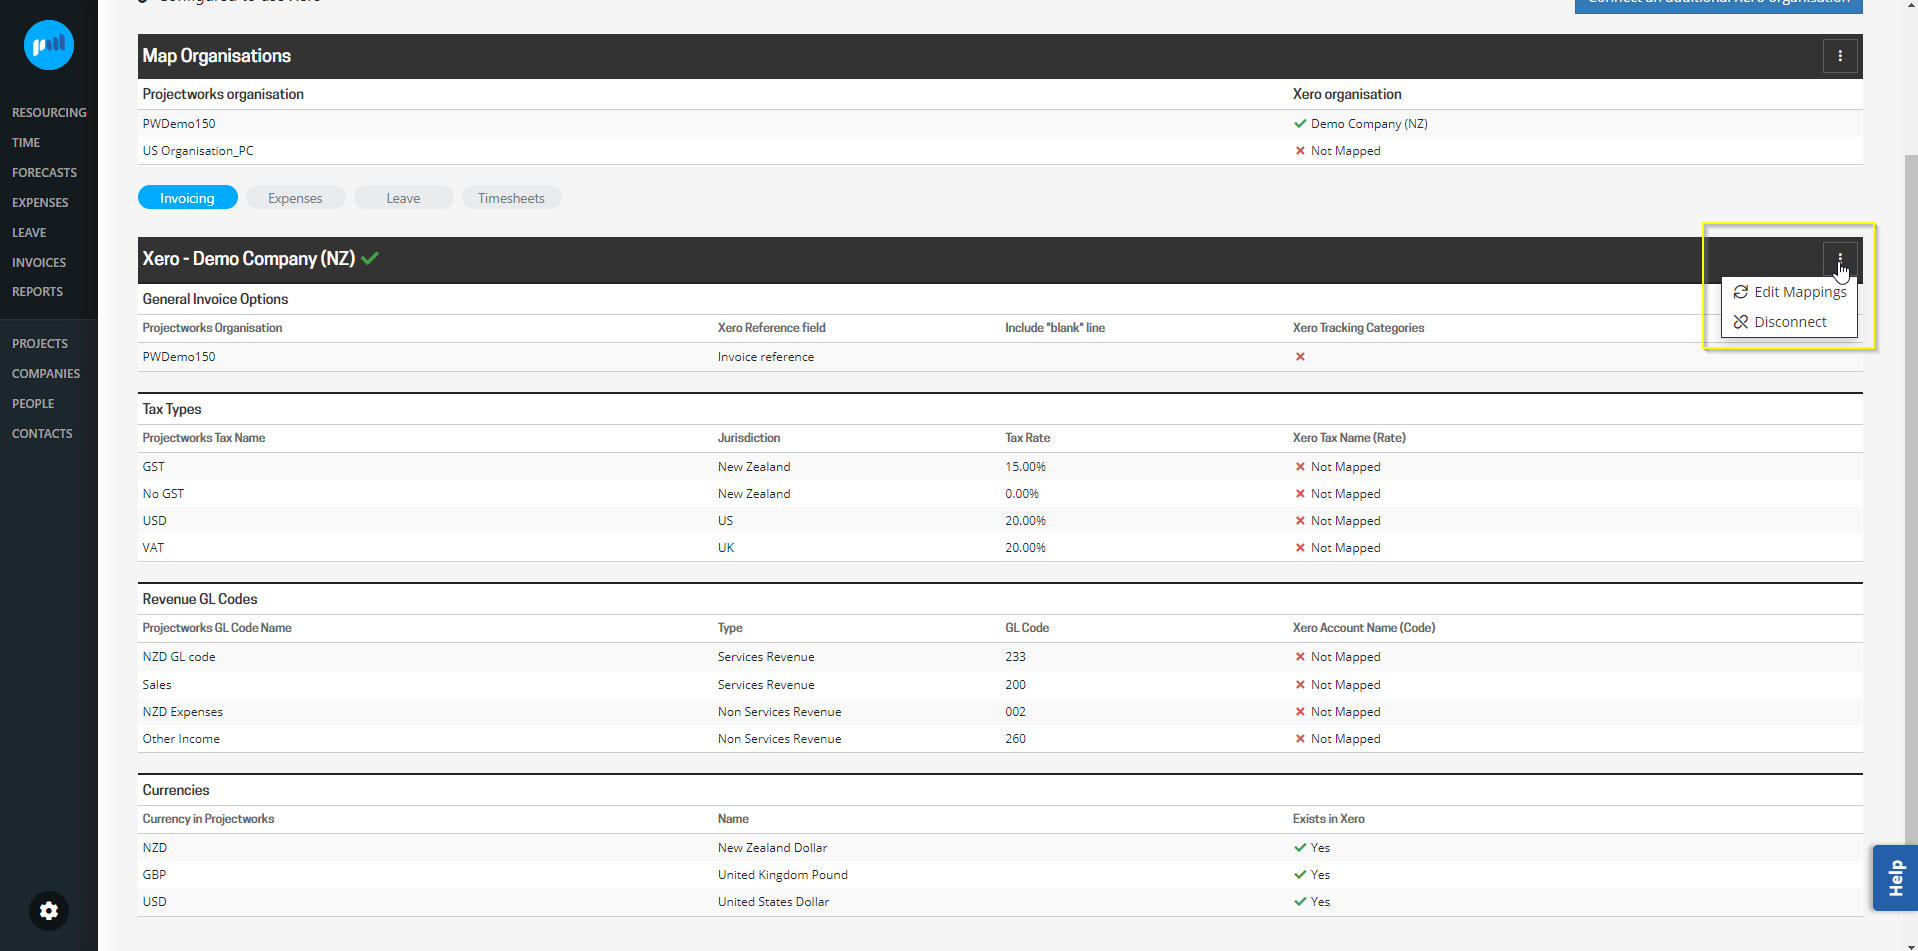
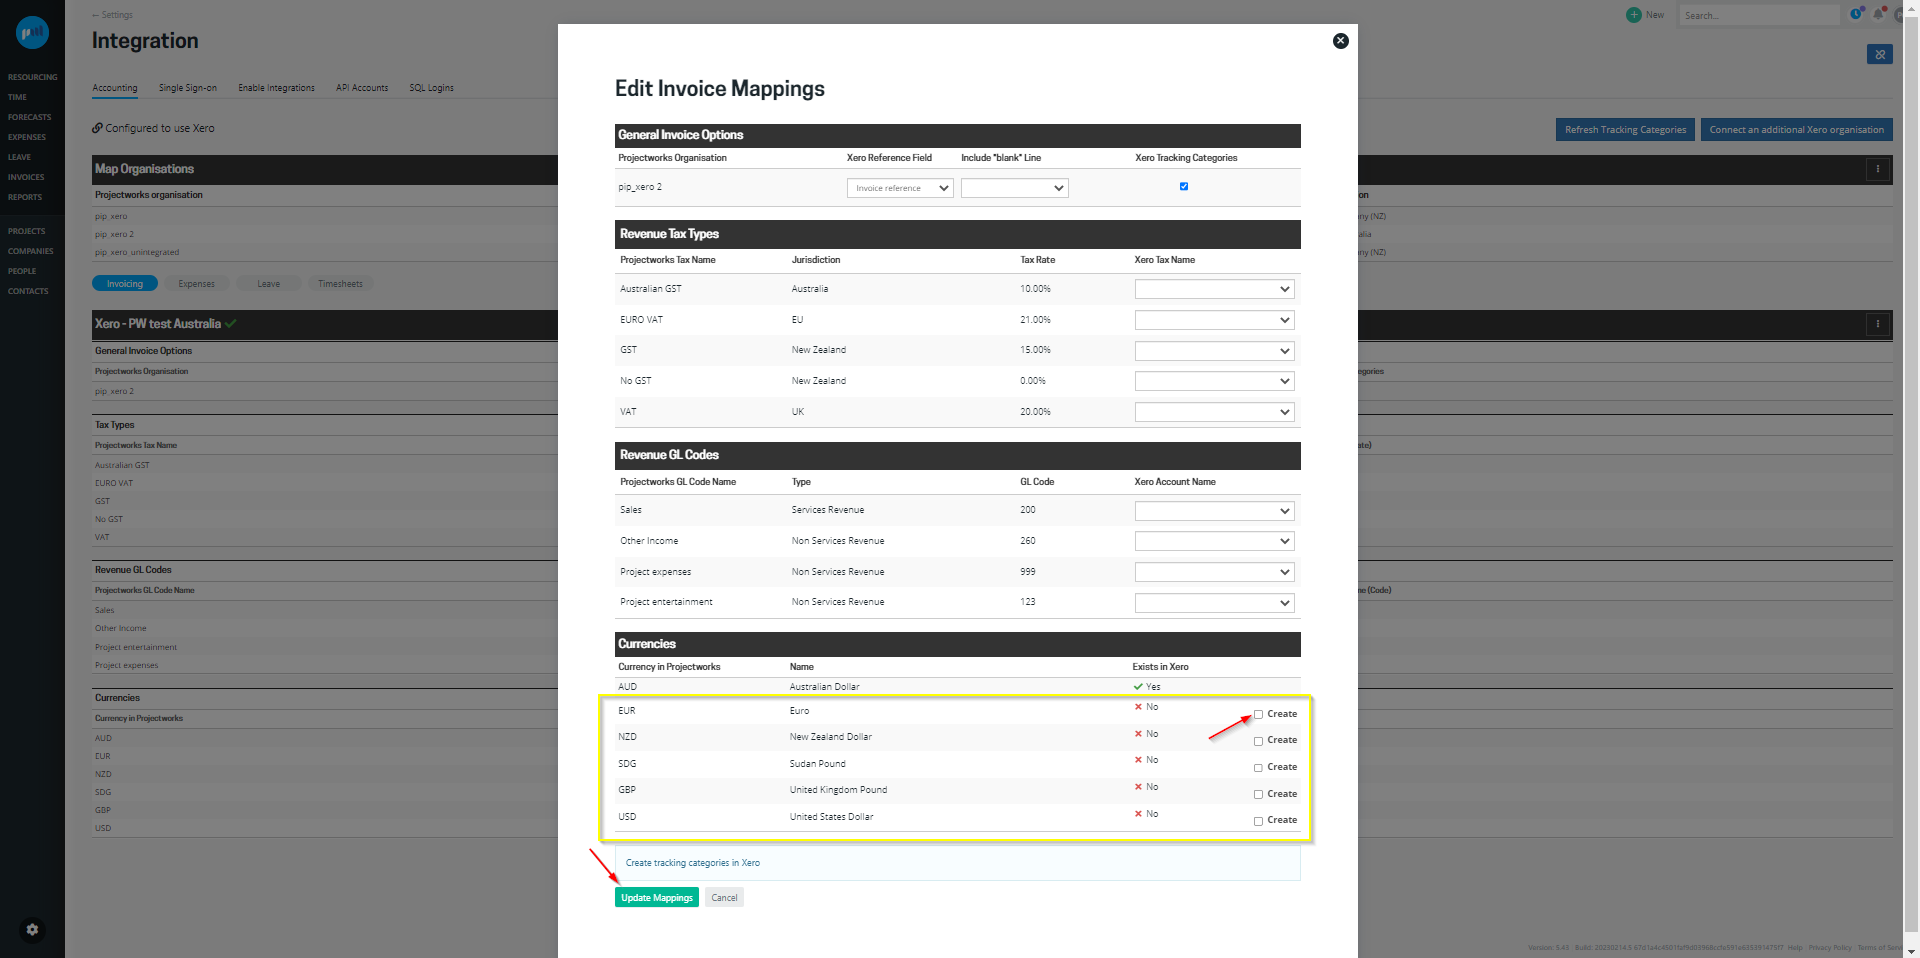
Edit invoicing mappings
To edit invoice mappings:
-
Go to: Settings > Integration > Accounting
-
Select the Invoicing option
-
Select the three vertical dots against the Xero - organisation you want to edit, and select ‘Edit Mappings’
If more than one Xero organisation is mapped to your Projectworks organisations, scroll down to map the other Xero organisations.
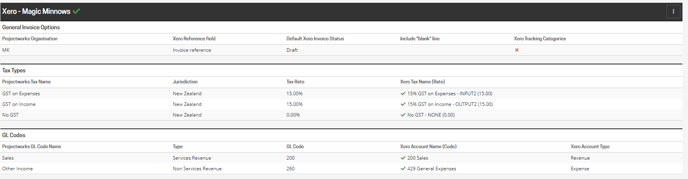
General Invoice Options
General invoice options allow values from Projectworks to flow to Xero, to reduce double handling of the invoices that you export.

As with any integration mappings, you will need to select to “Update Mappings” to save the Invoice Mappings.
Xero Reference Field
The Xero Reference Field defaults to “Invoice reference” when Projectworks is connected to a Xero organisation, however it can be updated to the “Project name”, “Project number” or the “Project number and name”.
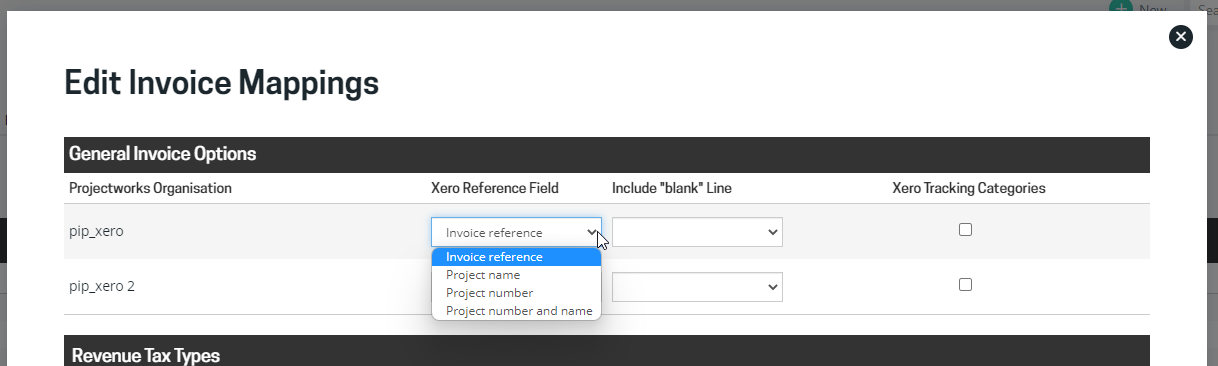
The Xero Reference Field that your Xero organisation is mapped to will dictate what will be displayed in the Xero “Reference" field for the exported invoice:
-
If the Invoice reference is selected, the PO Number/ Ref from the Projectworks invoice will be displayed;
-
If the PO Number/ Ref is blank, then the “Reference” field will remain empty.
-
-
If the project name is selected, the Projectworks project name will be displayed; or
-
If the project number is selected, the Projectworks project number will be displayed;
-
If the project doesn’t have a project number, then the “Reference” field will remain empty.
-
-
If the project number and name is selected, both the Projectworks project number and name will be displayed;
-
If the project doesn’t have a project number, then the project name only will be displayed.
-
Default Xero Invoice Status
The Default Xero Invoice Status defines what status the invoices created in Projectworks appear in Xero. You can choose between the following default status';
-
Draft - Invoices are created as ‘Draft’ invoices in Xero
-
Submitted - Invoices are created as ‘Awaiting Approval’ invoices in Xero
-
Approved - Invoices are created as ‘Awaiting Payment’ invoices in Xero

Note: If you export a $0.00 invoice to Xero with default status being set to Approved, Xero will consider the bill paid as there is no outstanding payment for that invoice
Include “blank” Line
The Include “blank” Line allows an extra line to be displayed at the top of the the Xero invoice, so that additional information required in the invoice can easily be included, e.g. the Projectworks project name or “Attention: Bugsy Malone”.
The Include “blank” Line defaults to nothing when Projectworks is connected to a Xero organisation, however it can be updated to “Invoice heading” or “Project name”.
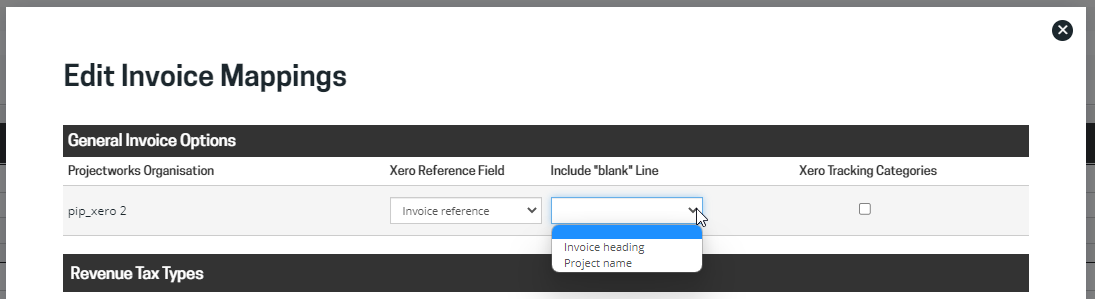
If the Include “blank” Line is saved to “Invoice heading” or “Project name”, an additional invoice line will be added to the Xero invoice when it is successfully exported.
-
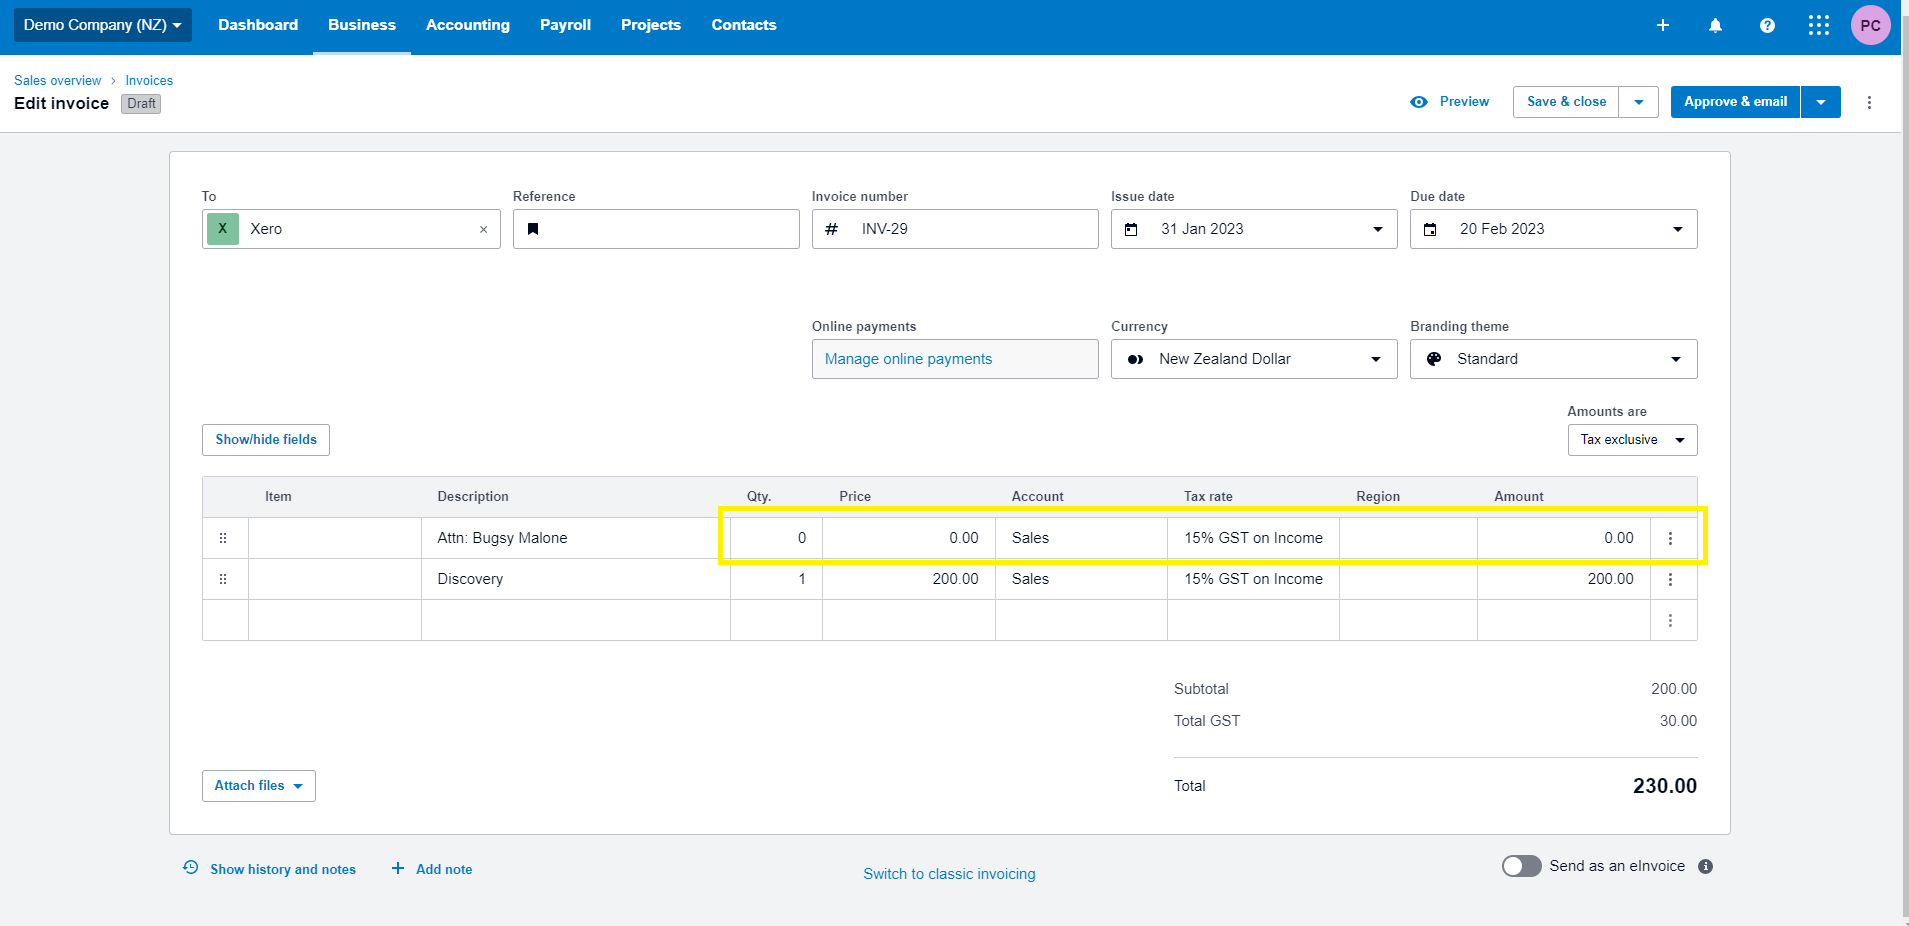
If “Invoice heading” is selected, then the Projectworks invoice heading will be displayed in the first invoice line of the Xero invoice.
- The invoice heading will initially default to the project reference number and project name, but can be manually updated in the Projectworks invoice. If the invoice heading is changed, all future invoices for that project will default to the invoice heading unless it is updated to something else.
-png.png)
- The invoice heading will initially default to the project reference number and project name, but can be manually updated in the Projectworks invoice. If the invoice heading is changed, all future invoices for that project will default to the invoice heading unless it is updated to something else.
-
“Project name” is selected, then the Projectworks project name will be displayed in the first invoice line of the Xero invoice.
Quantity, Price, Account, Tax rate and Amount values will also be exported to the Xero invoice, so will need to be removed if not desired.
Xero Tracking Categories
Tracking categories can be set up in Xero and be used as a way to categorise (or tag) invoices to allow another level of reporting such as identifying which geographic region or division the revenue or expenses are reported against.
You are able to allow the use of tracking categories on invoices within Projectworks, letting you do the categorising at the point of creating your invoice.
Read more about using Xero tracking categories on invoices →
Read more about mapping tax types →
Read more about mapping GL Codes →
Map Expenses
For Projectworks expenses to be exported to Xero, the expenses must be enabled for each Xero organisation, including:
-
General Expense Options
-
Tax Types
-
Cost GL Codes
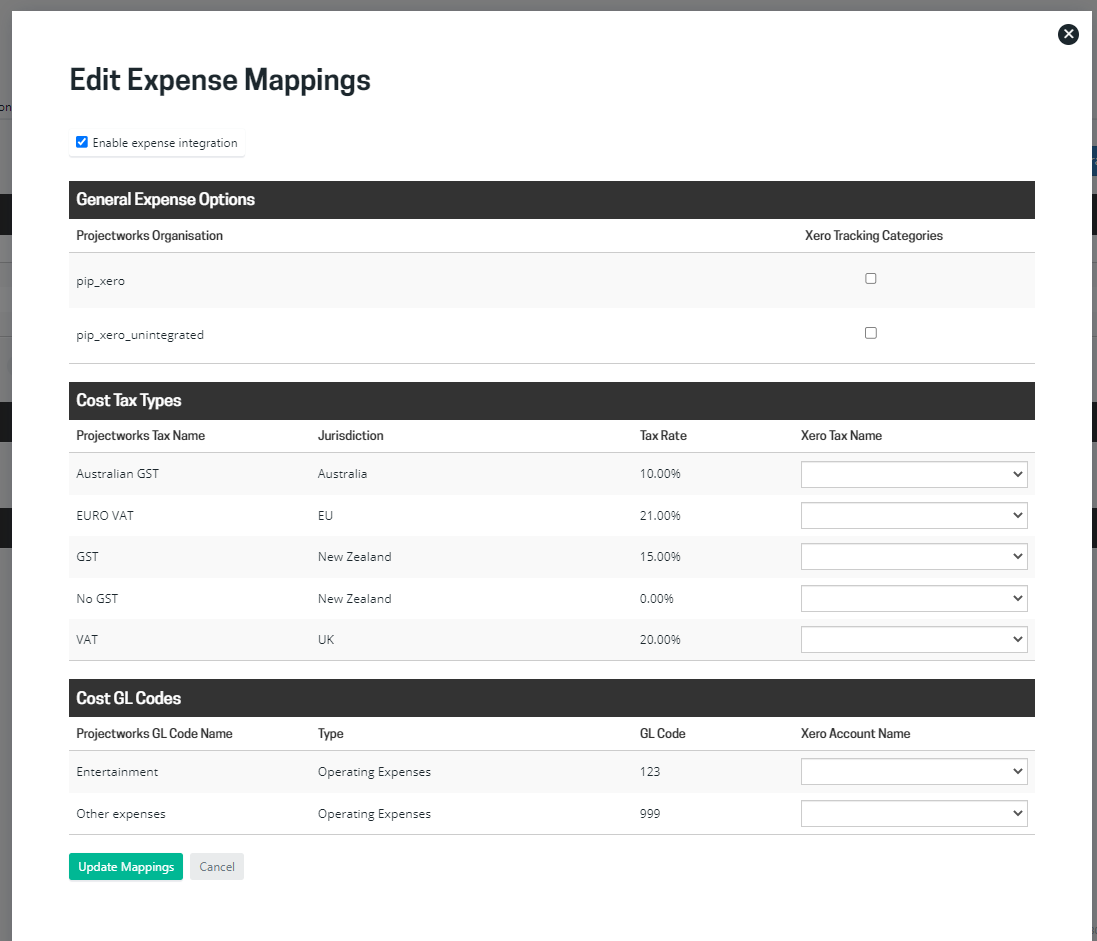
Enable expense integration
To enable expense integration to a Xero organisation:
-
Go to: Settings > Integration > Accounting
-
Select the Expenses option
-
Select the three vertical dots against the Xero organisation you want to enable and select “Edit Mappings”
-
Select to “Enable expense integration”
-
Map Tax Types and Revenue GL Codes as required and select “Update Mappings”
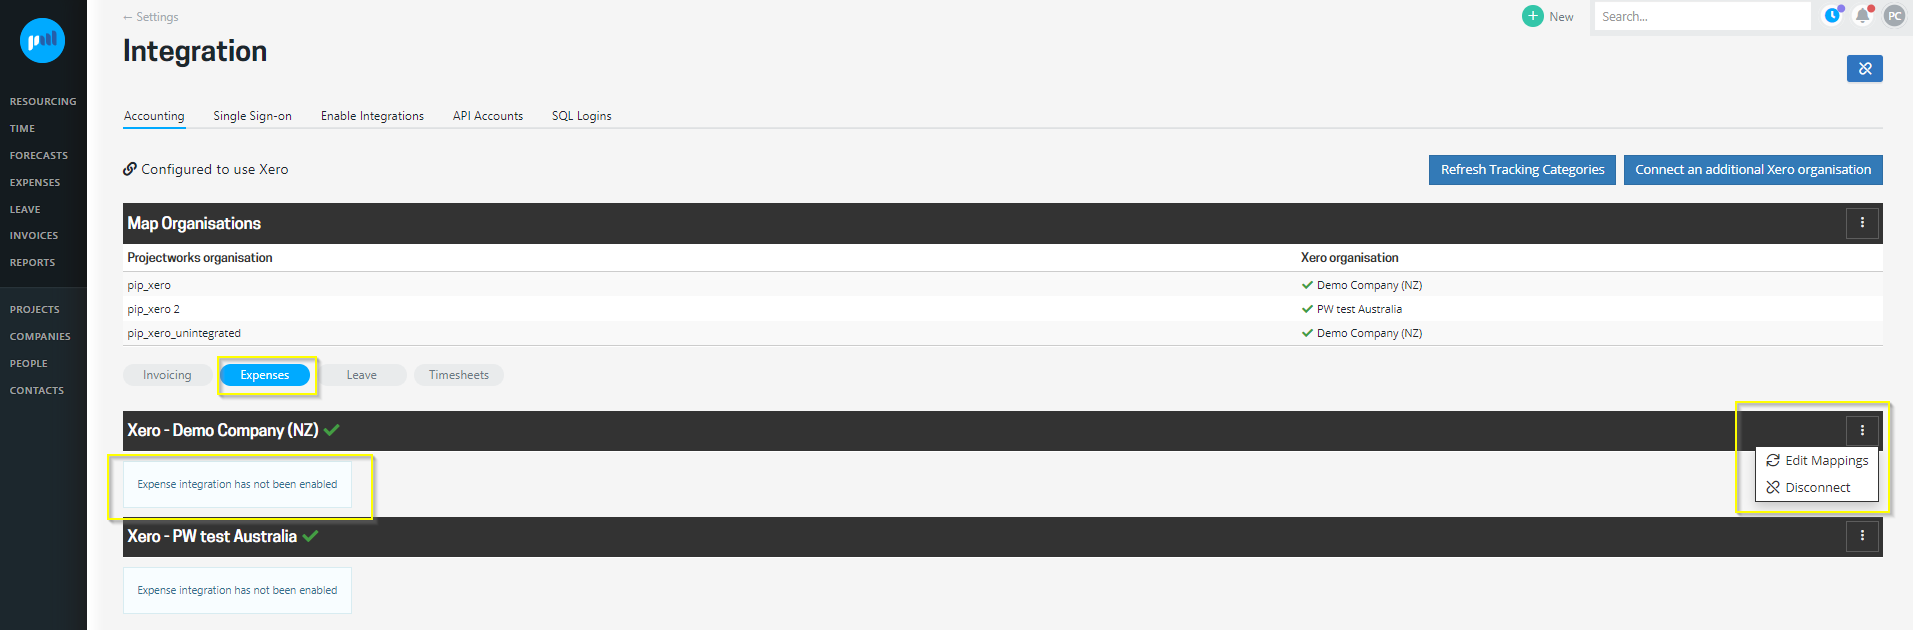
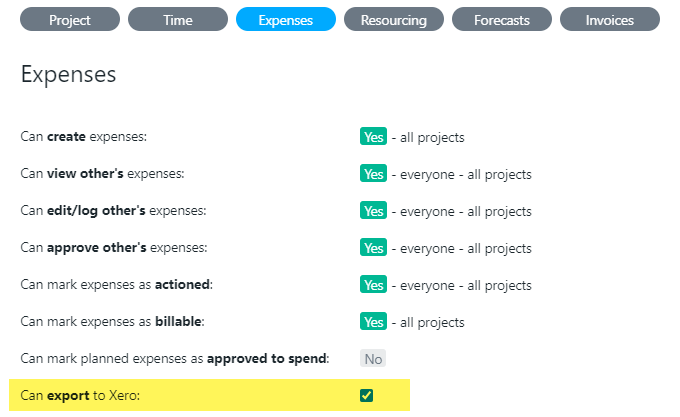
NOTE: If you don't see the enable expense integration option check your access level has been set up correctly. Under the expenses section, the can export to Xero option must be selected.
If multiple Xero organisations' are connected to your Projectworks environment, you can enable expenses in additional Xero organisations as required.
Edit expenses mappings
To edit expense mappings:
-
Go to: Settings > Integration > Accounting
-
Select the Expenses option
-
Select the three vertical dots against the Xero organisation you want to edit, and select ‘Edit Mappings’
Read more about mapping tax types →
Read more about mapping GL Codes →
Map Tax Types
Sales tax types set up in Projectworks will be displayed in the mapping tables. Only those that are being exported to the Xero Organisation are required to be mapped.
If a tax type has been added to Projectworks, but not mapped to a Xero Tax Name (Rate), you will get an error if you try and export an invoice or reimbursable expense that applies that sales tax rate.
Don’t worry! You can simply map the tax type and re-export the invoice or reimbursable expense.
Adding tax rates in Xero
Your local sales tax rates will be set up in your version of Xero when you initially sign up for Xero.
If you are raising invoices or expense claims from other jurisdictions that require a different tax rate, your Xero administrator may be required to set up a tax rate in Xero for that jurisdiction with the same percentage as the tax rates you are mapping.
Once your tax rates have been set up in Xero, these tax rates will appear in the Projectworks dropdown and allow you to select them to map to.
Map GL Codes
GL Codes must be set up in Projectworks to allow budgets to be created, which will allow
-
invoices; and
-
expenses;
to be raised against these budgets.
To set up GL Codes in Projectworks, a Projectworks administrator should go to:
Settings > System > GL Codes
A Projectworks administrator must map a Xero Account Name to each Projectworks GL Code Name to enable an invoice or an expense raised against the Projectworks GL Code Name to be exported to Xero.
A Xero administrator may need to add, edit or delete accounts in your Xero chart of accounts to map to a Projectworks GL Code.
This setup is complex, so be mindful when you set up the mappings to ensure that the correct mapping is in place to support your business practices.
Because Xero has strict requirements for mapping Tax Types to GL Codes, if you choose to have a mapping that has revenue GL codes matched to expense codes or vise versa, you must create two GST tax types, one for income and one for expenses and have them mapped in the Revenue and/or Expenses GL mapping. to ensure Xero will accept the attempted GL line exports

Map Currencies
All currencies set up in Projectworks will be displayed in the mapping table, and must exist in the Xero organisation to be successfully exported if you are:
-
exporting an invoice raised in that currency, or
-
exporting an expense reimbursed in that currency.
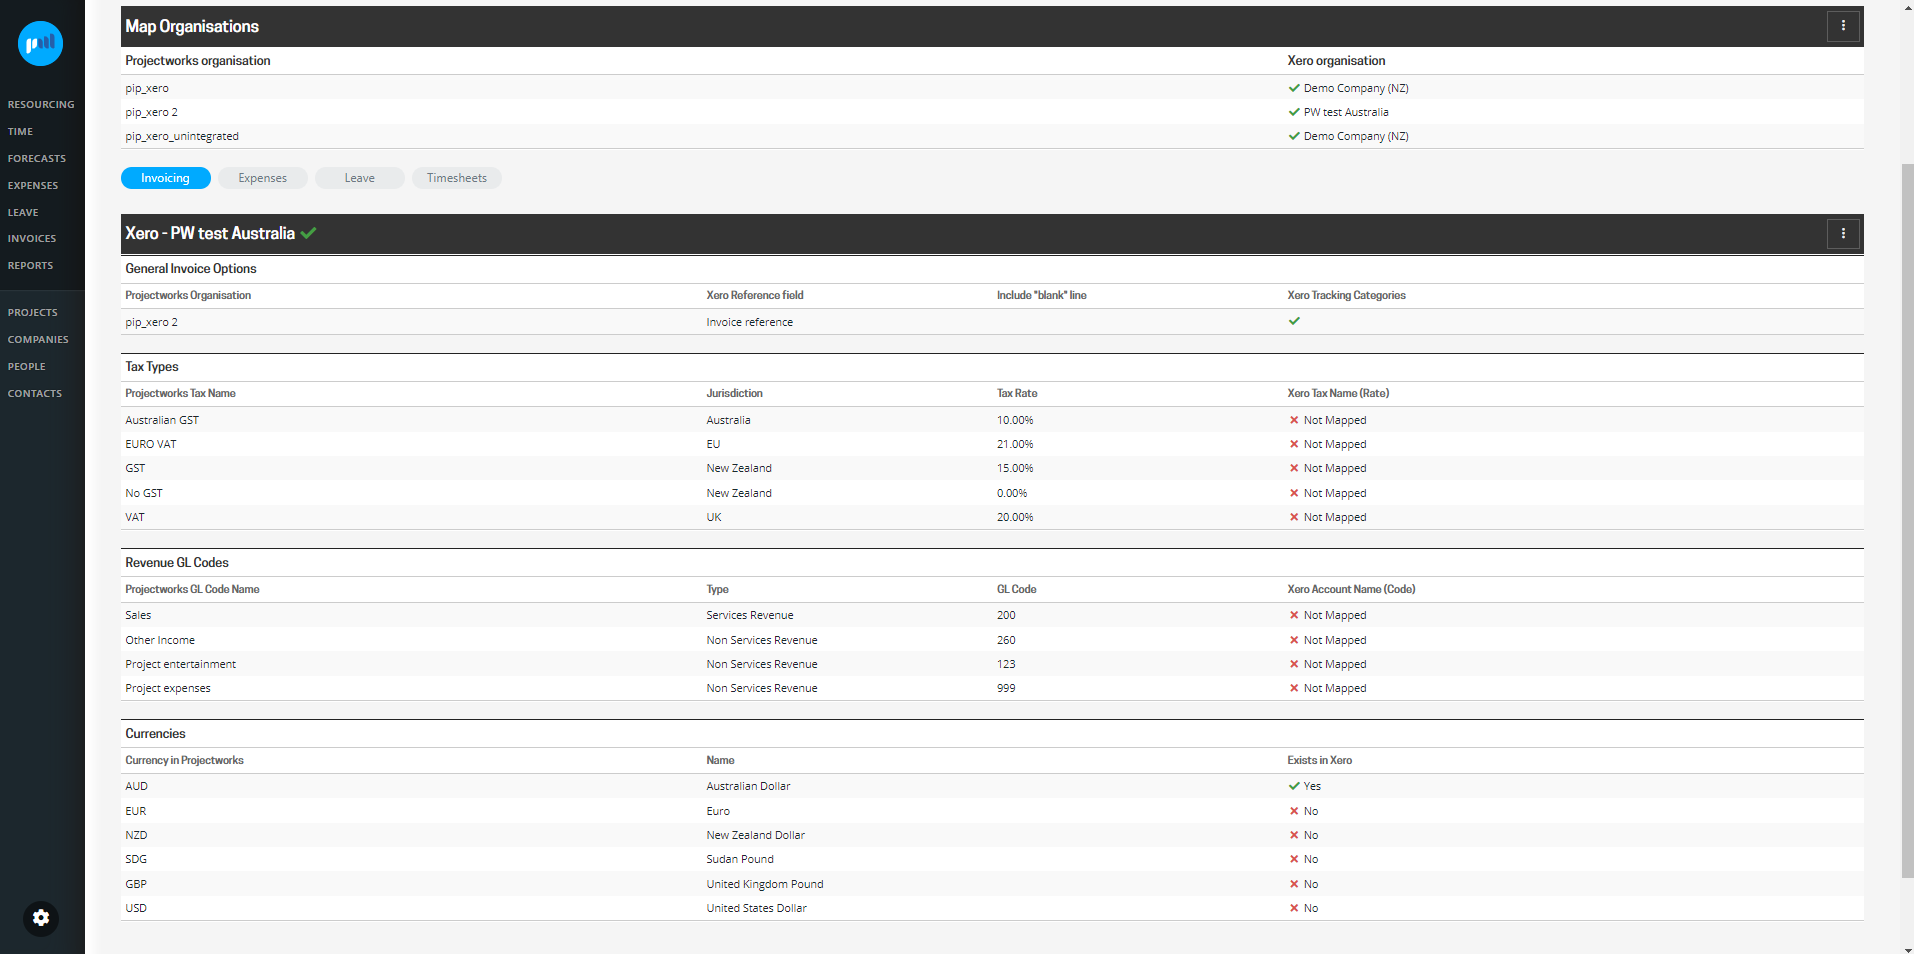
If a currency has been added to Projectworks, but the currency does not exist in Xero, you will get an error if you try and export an invoice or expense in that currency. You can simply create the currency in Projectworks and re-export the invoice.
Go to: Settings > Integration > Accounting, select “Edit Mappings” and “Create” the currency that requires creating in the Xero organisation.
Your Xero pricing plan will need to include multicurrency to add a foreign currency.
The currency mapping is managed as part of invoicing, but also applies to reimbursable expenses.
A Xero administrator can add foreign currencies directly in to Xero, and it will automatically map to the Projectworks organisation.
Map Leave
Approved leave in Projectworks can be exported to Xero payroll, removing the need for double handling.
To enable leave integration from Projectworks to a Xero organisation:
-
Go to: Settings > Integration > Accounting
-
Select the Leave option
-
Select the three vertical dots against the Xero organisation you want to enable and select “Edit Mappings”
-
Select “Enable leave integration”
-
Map Leave Types as required and select “Update Mappings”
If you require a different leave type to map to, your Xero administrator may be required to set up an additional leave type in Xero.
Read more about exporting leave to Xero→
Enable Timesheet integration
Reviewed time entries for hourly workers in Projectworks can be exported to Xero, to remove the need to double handling and enabling contractor payments form Xero.
To enable timesheet integration from Projectworks to a Xero organisation:
-
Go to: Settings > Integration > Accounting
-
Select the Timesheets option
-
Select the three vertical dots against the Xero organisation you want to enable and select “Edit Mappings”
-
Select “Enable timesheet integration” and select “Update Mappings”
To prevent time entries being exported to Xero, timesheet integration can also be disabled.
Read more about exporting time entries to Xero→
Access to export to Xero
If Xero integrations have been enabled and mapped, a User's access level must also have the Can export to Xero option selected to be able to export time, expenses, leave or invoices.
Projectworks administrators can update user access if required.
Go to: Settings > Users > Access Levels, select the Access Level and go to the “Time”, “Expenses”, “Invoices” or “Leave” tab and select Can export to Xero.