This article gives you a guide for choosing a billing method and a step-by-step guide for creating your invoice.
- Step 1: Choose your billing method
- Step 2: Create an invoice
- Step 3: Check your invoice details
- Step 4: Check the line items
- Step 5: Submit or approve your invoice ready for dispatch
Step 1: Choose your billing method
Before creating an invoice it’s worth checking the billing method on your project as this determines how your invoice lines are prepared and calculated. You can change them manually once created but it’s much easier to have them set correctly from the start. There are two billing methods available:
-
T&M: Uses your hours, billing rates and expenses to automatically compute an invoice's amount.
-
Fixed: Monthly revenue forecasts are entered against budget lines and used to create the invoice amounts. It’s like setting up a billing schedule.
Your Projectworks administrator can set the default billing method for all projects in “Settings > System > Project Defaults > Project default billing method (“Fixed (uses revenue forecasts)” or “T&M (uses time/expense entries)”).
On a per project basis, the billing method can be changed by users who have the permission to update project settings in: Projects > Project > Settings > Invoicing
Step 2: Create an invoice
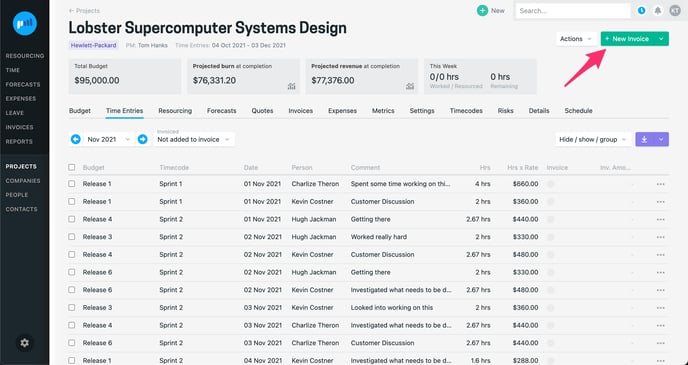
You can create an invoice from anywhere within a project or alternatively you can create an invoice from the All Forecasts screen.
-
If your project is running on a time and materials basis, you might want to start invoicing from a projects time entries screen. From here you can check all the time entries (group by person, week, timecode, whatever makes sense for you) and if everything looks good you can start invoicing.
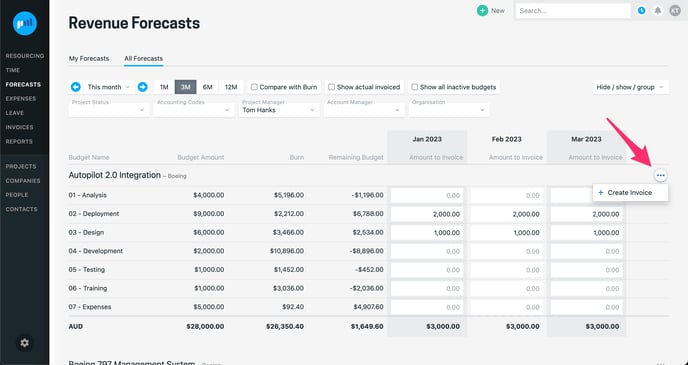
-
If your organisation works in a fixed fee mode and does all the invoices at once, the all forecasts screen is a great place for your team to review the billing schedule, project by project, creating invoices as you move down the list.
If you do not need to review time entries or the billing schedule prior to creating invoices, it may be more efficient to create invoices in bulk.
Step 3: Check your invoice details
We’ve covered where to create your invoice from but we want to make sure the details are correct. It’s best practice to check the following prior to completing and sending out your invoice:
Invoice Date
-
The Invoice Date will be defaulted based on the system settings (e.g. last day of previous month)
-
If you change the invoice date please be aware that the amounts on the invoice may change to reflect the time/expense entries and forecasts based on the new date.
Due Date
-
The due date is determined by the payment terms set for the company the invoice is addressed to (e.g. 20 days until payment is due).
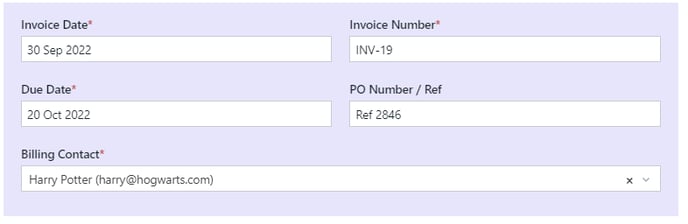
Billing Contact
-
This is to whom the invoice is addressed.
-
If the company has no billing contacts set up you can create one directly on the invoice by entering a name and email address (you can also create a new contact from within a company or the contacts screen)
Invoice Number
-
The invoice number is allocated based on the next number dictated from your system settings. The invoice number is able to be changed if required, however the number must be unique.
PO Number/Ref
-
You have the option to include a PO Number or reference onto your invoice.
-
This field may have been made mandatory by your Projectworks administrator (see project’s settings).
Step 4: Check the line items
The line item amounts will vary based on the billing method you’ve chosen.
T&M (uses time and expense entries)
Using the T&M billing method will result in each line item pulling through the amounts of all time entries and billable expenses for each budget up to the invoice date. All time entries and billable expenses prior to the invoice date will be shown if they haven’t been invoiced previously. The invoice amount then uses the hours, billing rates and expenses to automatically compute the amount to invoice.
You’re not locked into invoicing all time entries or expenses up to the invoice date. You have the ability to pick and choose which entries to include on your invoice. This is done by ticking or unticking the time and expense entries you want to include in your invoice. The amount of the invoice will change based on the value of the entries that are ticked.
You have the option to show the number of hours and the billable rate along with line item amount. Read more about showing qty x rate →
Fixed (uses forecasts)
Forecasting revenue plays an important part in the financial management of a project and your organisation. Think of a forecast as an indication of the amount that will be invoiced. Forecasts are entered within projects, against budget lines, within a month. So a forecast of $10,000 in May indicates the intention to raise an invoice in May for that amount.
When creating an invoice in Fixed billing mode, the amount for each budget line will be sourced directly from its respective forecasts irrespective of the value of time or billable expense entries. It’s advised to confirm the forecast amounts are accurate prior to invoicing.
Time and expense entries will still be associated with the invoice to reflect they have been billed, however these are not used to set the amount being invoiced to the customer.
It’s considered best practice to associate all time entries that have contributed to the appropriate invoice line.
Manual Override
Regardless of which billing method you’re using you have the ability to invoice any amount by using the manual billing method. You can still choose which time entries and billable expenses to associate against an invoice line. This provides more flexibility on your invoice as you’re not locked into your T&M or Forecast amounts.
Invoice adjustments can be made on time and expenses throughout the invoicing process. Invoice adjustments on time will result in write-offs or write-ons against a person. Read more about invoice adjustments on time →
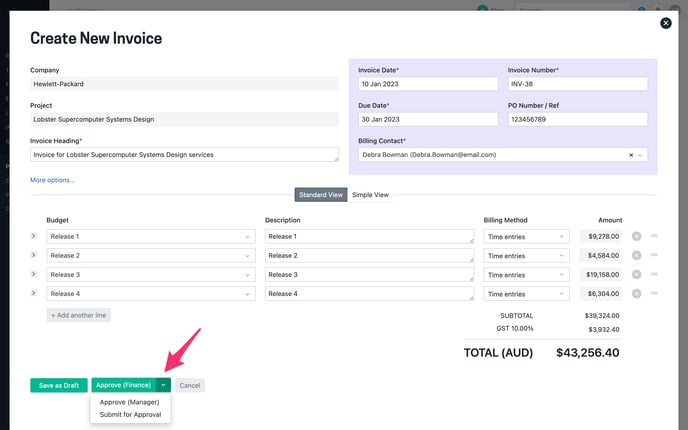
Step 5: Submit or approve your invoice ready for dispatch
Once happy with your invoice you can begin to move it through the approval work flow to be dispatched. Depending on your permissions you will be able to:
-
Submit for Approval: if an additional step is required before handing to finance
-
Approve (Manager): approve the invoice for finance to finalise
-
Approve (Finance): the final step before dispatching
Once in a Finance Approved state the invoice can be emailed to the customer and / or exported to your accounting system.