
Using planned expenses offers many benefits including better visibility of anticipated project costs and budget burn, an “approval to spend” on a project, and the ability to export these as bills to pay.
- Creating a planned expense
- The lifecycle of a planned expense
- Permissions
- Using planned expenses for purchase orders
- FAQs
Creating a planned expense
Creating a planned expense starts with the same flow as creating a normal company paid or reimbursable expense. From any screen click on the top left ‘+ New’ button and choose ‘Expense’. The first option you will see is whether the expense is already paid for, or if it is a planned or unpaid expense. By default ‘Already paid for’ will be selected, change this to ‘Planned or unpaid expense’ if the expense is to be paid in the future.

The remainder of the form is very similar to company paid or reimbursable expenses with a few things to note:
-
Project
-
Budget
-
Type of Expense
-
Comment
-
Price, Currency, Sales Tax
-
To be paid for with my own money first / Company to pay directly
-
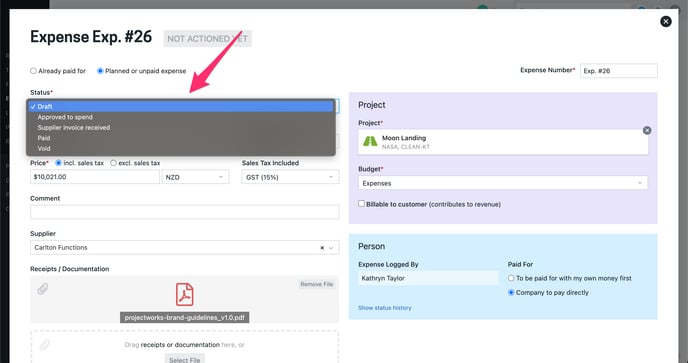
Status
The status field is specific to (and will only show for) planned expenses that are to be paid for directly by the company. Not all these statuses will be available all the time for everyone; read more about statuses and how these can support purchase orders. The status field can be set to:-
Draft
-
Supplier invoice received
-
Paid
-
Void
-
-
Expected Date / Date
-
This date will factor into projected burn (if billable to the customer) as well as projected margin.
-
If a planned expense passes it’s expected payment date it is not automatically updated to paid - this process is entirely in your hands where you can manually mark them as paid, or bring back the paid status from Xero if they have been exported as a bill to pay. You might also push out the expected payment date, or mark them as void (or delete them). Unless voided, all expenses will impact the budget burn and margin.
-
-
Supplier (Xero and QuickBooks customers only)
-
Supplier Invoice Reference
-
This field becomes visible when the planned expense status is set to ‘Supplier invoice received’
-
If the expense is marked as ‘Ready for export as a bill to pay’ this becomes a mandatory field
-
-
Payment Due Date
-
This field becomes visible when the planned expense status is set to ‘Supplier invoice received’
-
If the expense is marked as “Ready for export as a bill to pay” this becomes mandatory field
-
-
Ready to export as a bill to pay in Xero
-
The checkbox is specific to (and will only show for) planned expenses that are to be paid for directly by the company and in the ‘Supplier invoice received’ state.
-
Special permissions are required to see and edit this checkbox (read more)
-
- Receipts or documentation
-
Your Projectworks administrator can make attachments optional for company paid expenses, with control over requiring them dependent on the status (e.g. draft or paid). This might be useful if you have nothing to upload while still planning out your expense as a draft, but must upload something once a supplier invoice has been received. Reimbursable expenses always require an attachment.
-
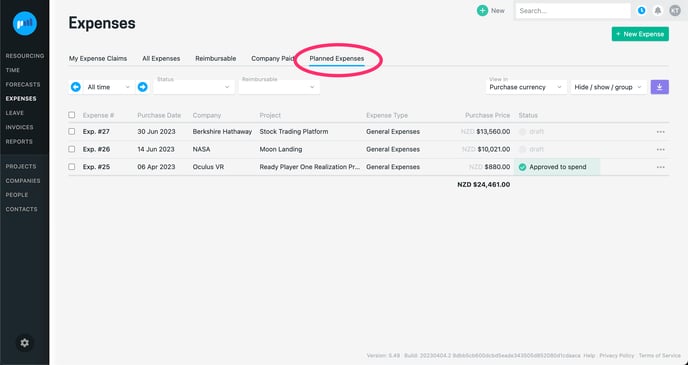
The lifecycle of a planned expense
Planned company paid expenses are designed to support a flexible lifecycle that can be entered at any point. Regardless of status you can see all your planned expenses in one place in Expenses > Planned Expenses.
Use statuses to communicate when you know expenses are coming, manage approval to spend, or just stick to 'Draft' to keep things open and simple.
You may like to use statuses for planned company paid expenses in the following ways:
-
Draft
Draft up your planned expense when you anticipate it is going to occur. If you have all necessary details you can skip this step and create your planned expenses as ’Approved to spend' or even as 'Supplier invoice received' right from the start if you have an invoice. -
Draft → Approved to spend
If you want some controls and visibility over approval to spend, you can enable permissions to mark planned expenses as ‘Approved to spend’ (by default this is off for all access levels). This essentially allows you to stamp an expense with an approved amount to spend. The details are still editable (things may change) but the stamp of who approved it, and for how much, will always be visible for reference.
If you don’t require approval to spend or already have the supplier’s invoice you can skip this status and go straight ‘Supplier invoice received’. -
Approved to spend → Supplier invoice received
Once you receive the supplier invoice you can update the planned expense with exact details, including payment due date. -
Supplier invoice received → Paid
Once the expense has been paid you can mark it as such. It will no longer be considered a planned expense and just be a normal expense that has been already paid for. -
Draft / Approved to spend / Supplier invoice received → Void
If a planned expense never eventuates you can set to a ‘Void’ status to keep a record of it. Void expenses will no longer impact project costs and budget burn, but are still editable so you may the change payment date, or delete if no longer valid.
Exporting planned expenses as a bill to pay suppliers (Xero and QuickBooks customers only)
It’s possible to create a planned expense in Projectworks and export this as a bill to pay the supplier in Xero or QuickBooks. For these exported expenses we also pull back the paid status from your accounting system once the supplier has been paid. This will then move the expense in Projectworks from ‘planned’ to 'paid'.
Read more about exporting planned expenses as a bill to pay suppliers →
Permissions
Anyone that can create an expense (company paid or reimbursable) can set them as planned. The ability to create expenses for a project is set at an access level, and can be restricted by projects the user is assigned to, is the project manger for, any project in their organisation, or any project in the system. This is set up and maintained by the Projectworks administrator in Settings > Users > Access Levels.
Read more about permissions for approval to spend →
Using planned expenses for purchase orders
It’s possible to use planned expenses for purchase orders, and as a lightweight PO approval process. Your Projectworks administrator can set a number of restrictions to help you better plan and control spend.
Read more about using planned expenses for purchase orders →
FAQs
-
What happens to planned expenses once the expected date is passed?
Nothing. Projectworks does not automatically change the status of planned expenses that pass their expected date. This is a manual process that is entirely in your hands. Depending on the scenario you may mark them as paid, push out the date, or mark them as void (or delete them). Unless voided, all expenses will impact the budget burn and margin. - I’ve accidentally set my planned expense to paid, but need to change it back - what do I do?
No problem! Change the expense to ‘Planned or unpaid expense’, and if it’s company paid expense, set the status to the desired selection (draft, approved to spend, or supplier invoice received).
.gif?width=688&height=248&name=2023-04-04_16-55-28%20(1).gif)
- I’ve accidentally created a planned expense instead of one that’s already been paid for - what do I do?
No problem! Change the status to Paid using the Status dropdown.
.gif?width=688&height=275&name=2023-06-08_20-03-08%20(1).gif)
-
Why is there no 'draft / approved to spend / supplier invoice received' status for planned reimbursable expenses?
Reimbursable expenses already have an inbuilt approval process.
Read more about approving reimbursable expenses → -
Why is there no “Supplier” field?
The supplier field is only available if you are integrated with Xero or Quickbooks, and must first be enabled by the Projectworks administrator. It will only show on company paid expenses.
Read more about adding a supplier field to expenses → -
Why can’t I export my planned expense as a bill to pay in Xero?
There are few things required before you can export a planned expense to Xero.
Read more about exporting planned expenses →